Settlement files – Onboarding Guide
This guide explains how to start receiving settlement files from Kivra. Settlement files contain information about incoming payments made through Kivra’s automatic payments service. They enable senders and partners to record and reconcile payments in their own systems.
For information on how to onboard the automatic payments service, click below.
Settlement Files - How it works
Settlement files contain daily summaries of automatic payments. Each file reflects the transactions settled on a given day.
- The file is generated once per day and made available on Kivra’s SFTP server. Files are only generated and sent on days when there are transactions (no file will be sent if there are no settlements to report).
- Senders or partners can fetch the file using their assigned credentials (username and password).
- Partners may reuse the same credentials across multiple customers to simplify management.
It is common for senders to use a partner system to receive and process the file.
Step 1 – Prerequisites
Your system must be able to import and process BgMax or CAMT.054 files.
Step 2 – File Formats and Versions
Kivra provides two supported file formats. Choose the one compatible with your internal systems.
BgMax
- Example file: ExampleCompany_2025-09-18-16-15-48.000000
- Bankgirot Documentation: Bankgirot Technical Manual – Autogiro
CAMT.054 (ISO 20022)
Supported versions:
- Version 2: Used by systems with Microsoft dependencies.
- Version 13: Recommended version.
Example files:
- report_ExampleCompany_20250918_141548_Camt.054.001.13.xml
- report_ExampleCompany_20250918_141548_Camt.054.001.02.xml
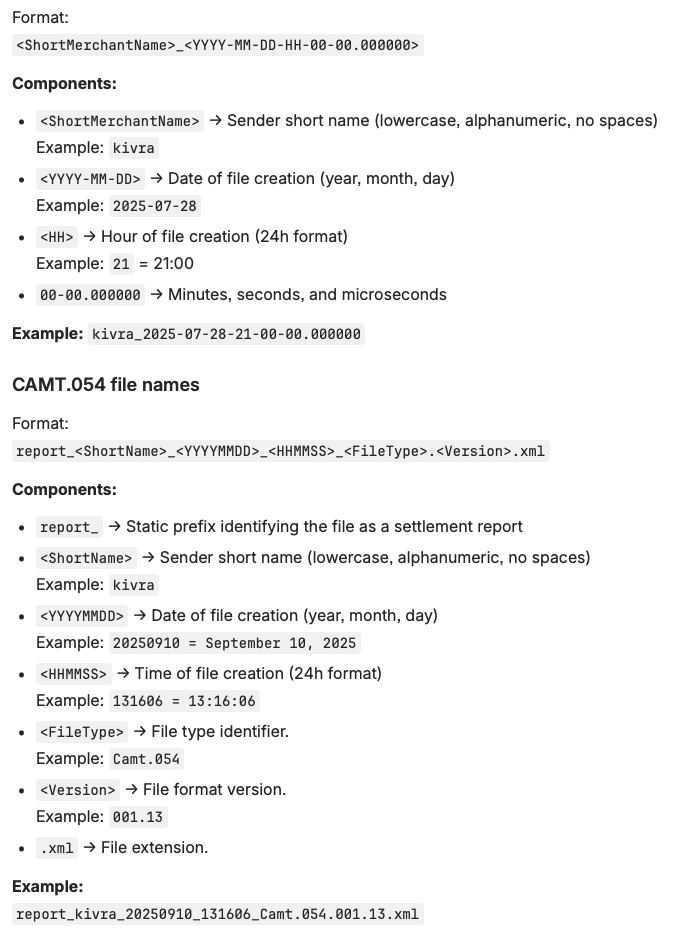
Step 3 – File Naming Conventions
Understanding the file naming structure helps you automate imports and track settlement dates.
BgMax file names
Step 4 – Access and Retrieval
- Connect to Kivra’s SFTP server using the credentials provided by Kivra.
- Download the daily settlement file (either BgMax or CAMT.054 format).
- Import the file into your accounting or reconciliation system.

If you need access or configuration support, contact avsandare.support@kivra.com.
Step 5 – Testing and Validation
Kivra provides functionality to generate a test settlement report based on your own data. This allows you to test and validate your system setup before going live.
How it works
-
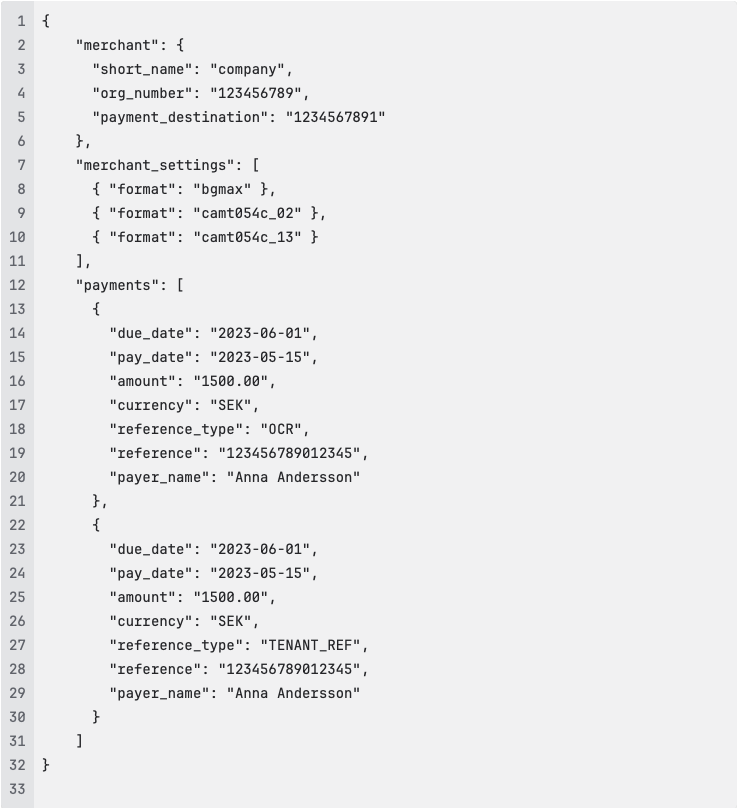
Prepare your test data file
Create a file containing example transaction data in JSON format. The file defines the merchant details, supported file formats, and payment transactions to include in the test settlement file.
Example file structure:
-
Send the test data to Kivra Email your file to avsandare.support@kivra.com and specify that it is for test settlement file generation.
-
Kivra generates a test report Using the data you provide, Kivra creates a valid settlement file that mirrors a real production file.
-
Receive the test file The generated file is sent to you by email, for you to upload to your SFTP.
-
Import and verify Import the test file into your accounting or reconciliation system to confirm that file handling, data mapping, and reconciliation processes function correctly.
Once you’ve successfully validated the test report, your system is ready to process real settlement files.
Step 6 – You’re Live
Once your system has successfully imported and processed the settlement files, the settlement file onboarding is complete.
When the automatic payment service is activated, you will start receiving settlement reports automatically via the SFTP channel. Files are only generated and sent on days when there are transactions (no file will be sent if there are no settlements to report).